To refinish an oak table, sand it to remove the existing finish, apply a wood stain or paint of your choice, and finish with a clear sealant or varnish for a refreshed look.
In this comprehensive guide, we will walk you through a step-by-step process for refinishing your oak table. Our goal is to help you effortlessly transform and elevate the appearance of your oak table, giving it a renewed and elegant aesthetic.
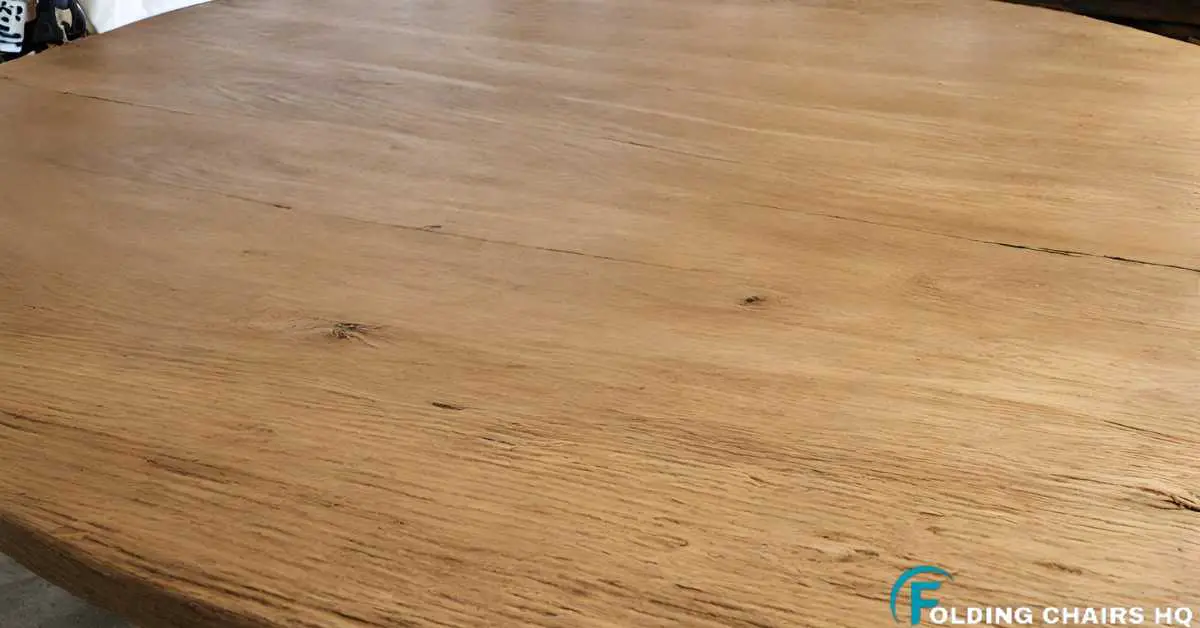
1. Oak Table Makeover
Transform your worn oak table into a stunning piece with a simple refinishing process. This guide explores effective techniques for sanding, staining, and sealing, breathing new life into your furniture.
Preparing Your Workspace and Tools
Before starting the refinishing process, it’s crucial to prepare your workspace. Ensure you’re in a well-ventilated area to avoid health risks from any fumes from stains or sealants. Protect against spills and drips by covering the floor with a drop cloth.
Gather all necessary tools and supplies beforehand to make the refinishing process seamless:
- Drop cloth: Protects the floors and surrounding area.
- Sandpaper (various grits): Removes old finishes and smooths out the wood.
- Wood stain: Achieves the desired color and enhances the oak’s natural grain.
- Clear sealant: Protects the stained surface and adds shine.
- Brushes and rags: Applies stain and sealant evenly.
- Respirator mask and safety glasses: Protects against fumes and sawdust.
Assessing the Condition of the Oak Table
A thorough examination of your oak table will help determine the level of care it requires. Look for superficial scratches that can be sanded away or deeper gouges that might need wood filler. Here’s what to look for:
- Surface scratches and blemishes: Indicates the level of sanding needed.
- Stability of the table: Fix any wobbly legs or loose joints before refinishing.
- Existing finish type: Specifies the sanding techniques and materials required.
- Signs of rot or severe damage: Helps assess whether it’s worth refinishing or if it’s time to retire the piece.
Sanding Down the Surface
Once your work area is prepared and the table is assessed, the next step is sanding. Start with coarser grit sandpaper to strip away the old varnish and smooth out imperfections, then move to finer grit to achieve a silky-smooth finish on the oak. Always sand in the direction of the wood grain to avoid scratches that can mar the table’s beauty.
Staining the Oak
After sanding, you’ll be ready to apply the stain to your oak table. Choose a color that complements the room where the table will reside and enhances the oak’s natural hues. Apply the stain with a brush or rag, working in manageable sections and maintaining a wet edge to prevent lap marks. Wipe away excess to reveal an evenly stained surface.
Applying a Sealant for Protection
The final step in your oak table makeover is to apply a clear protective sealant. This sealant will lock in the stain color and protect the surface from everyday use, preserving the beauty and integrity of your refinished oak table. Use a high-quality brush to apply a thin, even layer, and allow it to dry as per the manufacturer’s recommendations:
- Thin coats: Promote faster drying and prevent drips or bubbles.
- Adequate drying time: Essential for a hard and resilient finish.
- Lightly sanding between coats: Ensures a smooth final product.
Enjoying Your Refinished Oak Table
Now that your table is refinished, it’s time to enjoy the fruits of your labor. Whether it’s a family heirloom or a flea market find, your revitalized oak table will serve as a source of pride and a central piece in your home for years to come. With its refreshed look, it can once again be a gathering place for meals, conversations, and cherished moments.
2. Supplies for Refinishing an Oak Table
Refinishing an oak table can breathe new life into your furniture. However, having the right supplies is essential. High-quality sandpaper, a sturdy paintbrush, and the best wood stain or paint are some of the must-haves for this task. Proper preparation with these essential items ensures a smoother and more efficient restoration project.
Essential Chemicals and Solvents
Before you start the journey of refinishing your oak table, it’s crucial to have the right chemicals and solvents on hand. The proper selection aids in stripping the old finish, cleaning the wood, and preparing it for the new stain or varnish. Make sure to work in a well-ventilated area and wear protective gear when handling these substances.
- Paint Stripper: This substance removes the existing finish from your oak table. Choose a paint stripper designed for the type of finish you’re dealing with, whether it’s varnish, lacquer, or paint.
- Mineral Spirits: Useful for cleaning the wood after stripping it, mineral spirits help remove any lingering residue.
- Wood Conditioner: Applying a wood conditioner ensures an even application of stain, particularly important in woods like oak, known for its porous nature.
- Stain or Paint: The color choice for your refinished oak table can transform its appearance. Pick a stain or paint that flatters the wood’s natural grain and complements your space.
- Polyurethane or Varnish: To protect your freshly stained oak table, a top coat of polyurethane or varnish is essential. It adds durability and a lovely sheen.
Tools and Materials
With the right tools and materials in hand, the task of refinishing your oak table transitions from daunting to doable. Precision in tool selection leads to a smoother process and a flawless finish. Start with a set of basics and ensure they’re in good condition to achieve professional-looking results.
- Sandpaper: For sanding the wood surface smooth, use coarse grit for initial stripping and fine grit for finishing touches.
- Power Sander: This tool speeds up the sanding process and is ideal for large tabletops.
- Brushes and Applicators: High-quality brushes for applying stripper, stain, and finish are worth the investment.
- Clean Rags: Necessary for wiping off excess stains and for clean-up.
- Tack Cloth: After sanding, use this sticky cloth to pick up all the dust and debris for a clean surface to work on.
- Gloves and Masks: Protect your skin and lungs from chemicals and dust. Always prioritize safety.
- Drop Cloths: Protect your floor and surrounding areas from spills and drips.
Remember, elegance lies in the details, and a well-executed refinishing project can breathe new life into your oak table. Ensure you’re thoroughly prepared, and you’ll be on your way to turning that worn-out table into a piece of art.
3. Cleaning the Oak Table
Cleanliness is key to a flawless oak table. The third step in restoring your oak table involves thoroughly clearing away dust and dirt. This guide provides innovative techniques to ensure your oak table looks brand new.
Giving new life to your oak table begins with a crucial step: cleaning. Proper cleaning is foundational to any renovation task, and when dealing with solid oak tables, the process plays a vital role in ensuring the subsequent refinishing is a success.
Preparing for Cleaning
Before diving right into cleaning, it’s necessary to prepare your work area and gather the right cleaning materials. Here’s how to get started:
- Create Ample Space: Clear enough room around the oak table, ensuring you can move around freely. A spacious setting promotes efficient scrubbing and minimizes the chance of overlooking any spots.
- Gather Necessary Materials: Securing appropriate cleaning equipment beforehand saves time and effort mid-process. You’ll need a bucket, mild soap, a soft cloth or sponge, and clean water for rinsing.
The Cleaning Process
Immediate care is required when cleaning your oak table to prevent causing damage. This guide provides a roadmap through the cleaning process, familiarizing you with the necessary steps:
- Wet the Sponge: Soak your sponge or cloth in a mixture of warm water and mild soap. Wring out excess water to prevent soaking the wood too much and causing it to swell.
- Gentle Scrub: Start cleaning surface dust and grime using your damp sponge. Keep your strokes light and in line with the wood grain to avoid scratching the oak.
- Rinse and Dry: After scrubbing, rinse the table using a clean, damp cloth. Drying it immediately with a dry, soft cloth helps prevent watermarks from forming on the table.
With your oak table now clean and dry, you’re ready for the next phase of the refinishing process.
4. Stripping the Oak Table
Preparing for refinishing begins with stripping the old finish off your oak table. This step requires patience and caution to prevent any damage. The process revives the timber, revealing the natural beauty of the oak underneath.
Giving your oak table a new lease on life begins with stripping it of its old, tired finish. It is a crucial process for refurbishing and breathing fresh life into your oak table. By using the right procedure and tools, you can prepare your table surface for stunning refinishing.
Let’s dive into the specifics of this stage:
Preparing the Area for Stripping the Oak Table
Before we delve into how to strip the oak table, it’s wise to prepare your working area. Unforeseen mishaps, like accidentally staining your floor or carpet with the stripping solution, can be avoided. Consider these essential steps:
- Setting up in a well-ventilated spot: Stripping solutions can release harmful fumes, so it’s best to work either outdoors or in a room with adequate ventilation. Always keep your safety in mind.
- Laying down a Protective Cover: Place a drop-cloth or old newspaper to catch drips or spills from the stripping solution. This reduces the cleanup task afterwards.
- Wearing protective gear: To avoid skin irritation or other health concerns, wear gloves, a mask, and safety glasses. These pieces of protective clothing shield your skin, eyes, and lungs from the harsh chemicals.
Steps for Stripping the Oak Table
Once your workspace is set up, you can now launch into the stripping process. It can seem daunting, yet it’s relatively straightforward once you adopt this method:
- Applying the Stripper: Coat the table with a generous amount of chemical stripper, using a natural-bristle brush. It’s vital to follow the manufacturer’s instructions regarding waiting time.
- Scraping Off the Finish: Once the finish bubbles (which shows it’s ready), use a paint scraper or putty knife to scrape off the old finish. Do this gently to avoid causing scratches or damaging the wood.
- Cleaning Up: Once all the old finish is scraped off, clean up with mineral spirits or a stripping after-wash. Wipe off excess using a clean rag to prevent residues from hindering your refinishing stages.
This process might require repetition, especially if your table has a thick or stubborn old finish. However, patience pays off, as this step significantly determines your table’s final look. We’re now ready to embark on refinishing the oak table! Let’s proceed to the next phase without skipping a beat.
5. Sanding the Oak Table
Experience the transformative process of oak table restoration through sanding. This segment of our comprehensive guide, ‘How to Refinish an Oak Table’, delves into techniques and tips for smooth sanding. Master the art of wood refinement and breathe new life into your old oak table today!
Refinishing an old oak table can breathe new life into a piece that’s seen better days. The sanding process is where things start to get exciting, as you’ll witness the transformation firsthand. Removing the old finish will reveal the wood’s natural beauty and prepare it for a fresh new coat.
Choosing the Right Sandpaper
Before getting started, it’s essential to select the appropriate sandpaper grit:
- Coarse grit (40-60): Good for removing old finishes and heavy scratches.
- Medium grit (80-120): Ideal for smoothing out the surface after using coarse sandpaper.
- Fine grit (150-220): Best for finishing the surface before applying stain or sealer.
Using the right sequence will ensure you don’t damage the wood and achieve a smooth finish.
Preparing to Sand
Sanding can be a messy endeavor, so good preparation is key:
- Clear the work area: Ensure that your working space is free of dust and debris to avoid any particles sticking to the table during the sanding process.
- Secure the table: Make sure the oak table is stable. Use clamps if needed to prevent it from moving while you sand.
- Wear safety gear: Dust masks and protective eyewear are non-negotiable to safeguard your health and comfort.
In this way, you’ll create a safe and efficient sanding environment.
The Sanding Process
Start with the coarser grit sandpaper and work your way through to the finer grits. Here’s how:
- Apply even pressure and sand in the direction of the grain.
- Periodically wipe down the surface with a tack cloth to remove sawdust.
- Check your progress frequently to avoid oversanding one area.
Remember, patience is key to achieving a professional-looking finish.
Post-sanding Cleanup
After the sanding is complete, there’s an important cleanup step:
- Remove all dust: Using a vacuum or tack cloth, diligently remove all remnants of sawdust from the table.
- Inspect the surface: Look for any scratches or uneven areas that might need a bit more sanding.
Taking care of these details ensures a perfect foundation for the finishing touches.
Finishing Thoughts on Sanding
Sanding down an oak table is about more than just labor; it’s an art that requires attention to detail and a gentle hand. With the right approach and tools, your oak table will be ready to soak up a new stain or finish, setting the stage for a stunning result that will surely become a conversation piece in your home.
6. Refinishing Oak Table and Chairs
Discover the art of refreshing your oak table with our step-by-step refinishing guide. Transform your dining set with simple techniques that bring out the wood’s natural beauty and ensure lasting durability.
Refinishing an oak table and chairs can breathe new life into your dining area, creating a welcoming, cozy, and elegant space. This task, though seemingly daunting and time-consuming, is entirely achievable with the correct knowledge and tools.
Assessing The Condition
Before jumping in, it’s crucial to understand the current condition of your oak table and chairs:
- Minor Damages: Look for minimal scratches or marks. These can often be repaired easily during the refinishing process.
- Major Damages: For any cracks or splits in the wood, consider seeking professional help. Refinishing might not fix significant structural issues.
- Quality Check: Ensure the furniture is made entirely of oak; otherwise, the refinishing steps may vary.
Gathering Supplies
Let’s ensure you are perfectly equipped for this task. Here’s a handy list:
- Sandpaper: Needed for smoothing down the surface.
- Wood Stain: Choose a color that complements not only oak wood but also the rest of your décor.
- Sealant: To protect your newly refinished pieces.
- Tools: Common household items such as a paintbrush, lint-free cloths, and gloves.
The Sanding Procedure
Sanding is a critical step in refinishing any wooden furniture. By effectively removing the old coat, we ensure a clean and smooth surface for the new finish. Start with coarse-grit sandpaper for the initial stripping, then transition to medium and fine-grit for a polished look.
Always remember to sand along the grain of the wood to avoid unsightly scratches.
Selecting And Applying Stain
It’s not simply about picking a color you like. Here are few things to consider:
- Consistency with Decor: Ensure the stain complements your existing interior design.
- Drying Time: Different stains have varied durations for drying. Pick one that suits your timeline.
- Application: Apply the stain evenly with a paintbrush, and remove any excess with a lint-free cloth.
Sealant Application
Lastly, give your refinished oak table and chairs the protection they deserve. Apply a coat or two of your chosen, high-quality sealant with a paintbrush, allowing ample drying time between coats. This crucial step ensures all your hard work isn’t wasted, offering a robust defense against future wear and tear.
From battered and old to elegant and new, take pride in successfully reviving a part of your home’s essential decor.
7. Natural Wood Look for Oak Table
Refinishing an oak table can rejuvenate its natural wood appeal, creating a warm, inviting centerpiece in your space. This transformative process restores the table’s inherent beauty, highlighting the intricate grain patterns unique to oak.
The charm of natural wood on an oak table cannot be understated. Not only does it add a rustic, homely touch to your living space, it also tells a story—one that resonates with the natural beauty of nature’s bounties. With proper refinishing, you can enhance and preserve this natural beauty, focusing the spotlight on the organic charm of your oak table.
Step-by-step Guide to Achieve a Natural Wood Look
Here’s a simplified, manageable breakdown of the steps to best pull off the natural wood finish for your oak table:
- Choose the right finish: Opt for a clear, natural sealant that enhances the wood grain without camouflaging its true nature. Satin or semi-gloss polyurethane varnishes give a robust, durable finish that enhances the rich, golden hues of oak.
- Smooth sanding is vital: Start with a coarser-grit sandpaper and gradually move to a fine one. This helps remove any old finish and smooths the surface, preparing it perfectly for the new sealant.
- Clean the surface thoroughly: After sanding, removing dust and particles with a vacuum or microfiber cloth ensures a flawless finish. A tack cloth works wonderfully after vacuuming to ensure a completely speck-free surface.
- Seal it in: Apply the finish smoothly, following the wood grains. Always allow sufficient drying time between layers for the best results.
Remember to follow safety guidelines during the entire process, including wearing a dust mask during sanding and keeping your workspace well-ventilated.
Expert Tips for Maintaining the Natural Look
Maintaining the rustic charm of your oak table is easier than you think. Let’s uncover the secrets:
- Regularly dust the table: Regular dusting enhances the luster and longevity of the natural wood finish. Utilize a soft, dry cloth to prevent surface scratches.
- Use coasters: Prevent water rings and stains by insisting on the use of coasters. This simple step can significantly increase the life of your finish.
- Stay away from harsh cleaners: Any cleaning product containing ammonia or bleach can damage the wood finish. Stick to using a damp cloth for cleaning, followed by an immediate wipe down with a dry cloth.
- Periodic touch-ups: Depending on the usage, consider a yearly or bi-yearly touch-up of the finish to keep your table looking new and vibrant.
Your oak table is a silent testament to your love for natural elements. With these straightforward techniques, you can preserve the inherent beauty of the wood, creating a focal point for all who enter your space.
8. Durable Finish For Oak Table
A durable finish enhances both the appeal and the lifespan of your oak table. By following the right refinishing procedure, you can restore your oak table’s natural charm. With quality materials and proper technique, your refinished oak table can stand the test of time.
The classic and timeless beauty of an oak table is undeniable. Its grainy texture brings warmth and a touch of nature to your home decor. However, to keep it looking its best, a proper finish is necessary. In this next part of the guide, we will discuss how a durable finish can extend the life and uphold the beauty of your oak furniture.
Choosing the Right Finish for Your Oak Table
Picking the most suitable finish for your oak table can seem like a daunting task due to the numerous options available on the market. Here are a few things you need to consider:
- The Dining Table’s Use: If your table frequently hosts dinners and parties, a finish resistant to heat, stains, and scratches, such as varnish or polyurethane, is preferable.
- Look and Aesthetics: For those partial to a natural appearance, oil-based finishes like linseed or tung oil should be your go-to choice. They penetrate the wood, emphasizing the grain and giving it a warm glow.
- Application Ease: Some finishes, like wipe-on poly and Danish oil, are easy to apply, even for beginners. They require fewer coats and have incredibly straightforward instructions.
Applying the Selected Finish
Once you’ve decided on your finish, it’s time to apply it. This process might initially seem complicated, but with patience and the right techniques, you can give your oak table a durable and attractive finish.
Taking action step by step ensures a smooth application. Begin by ensuring your workspace is properly ventilated; safety comes first. Next, lightly sand the table for a smooth surface. This allows the finish to adhere better to the table.
Then, apply the finish using a brush or cloth, always going with the grain. Be sure to allow ample drying time between coats for the best results.
Finally, a well-applied, durable finish not only enhances the beauty of your oak table but also protects it from damage and wear over time. By selecting the right finish and applying it correctly, you ensure your cherished piece stands the test of time, retaining its beauty and charm for years to come.
So roll up those sleeves and give refinishing a try—your oak table deserves no less!
Frequently Asked Questions
1. What is the process of refinishing an oak table?
The process involves cleaning, stripping, sanding, and applying a new finish to the table. Each step is crucial to ensuring a high-quality result.
2. Why should I refinish my oak table?
Refinishing your oak table can restore its original beauty, protect it from damage, and extend its lifespan. It’s also a cost-effective alternative to buying a new table.
3. What supplies do I need to refinish an oak table?
You’ll need cleaning supplies, a chemical stripper, sandpaper, and a new finish. Other useful tools include a paintbrush, a putty knife, and protective gear.
4. How do I clean an oak table before refinishing it?
Start by wiping the table with a damp cloth to remove dust and grime. For stubborn stains, use a mild soap or wood cleaner.
5. What’s the purpose of stripping and sanding an oak table?
Stripping removes the old finish, while sanding smooths out the wood surface. Both steps are necessary to prepare the table for the new finish.
6. Can I refinish oak chairs to match my table?
Yes, you can follow the same refinishing process for your oak chairs. This ensures a consistent look across your furniture set.
7. How do I achieve a natural wood look for my oak table?
You can achieve a natural wood look by using a clear or lightly tinted finish. This enhances the wood’s natural grain without altering its color.
8. What type of finish is durable for an oak table?
Polyurethane finishes are popular for their durability and resistance to water, heat, and scratches. They’re ideal for tables that see daily use.
Conclusion
Refinishing an oak table is indeed a rewarding project that revitalizes your furniture. With the appropriate tools, materials, and techniques, you can transform an old, worn-out oak table into a stunning centerpiece for your home. This process not only enhances the aesthetic appeal of your space but also extends the lifespan of your furniture. Remember, the key to a successful refinishing project lies in patience, attention to detail, and a deep appreciation for the natural beauty of wood. Enjoy your refinishing project!
We appreciate your feedback on this guide. Please take a moment to rate and share your thoughts in the comments below. Your input is invaluable, and it helps us improve our content. Thank you for contributing your time.